Showing posts with label 1971. Show all posts

Thursday, July 3, 2014

Great Pacific Northwest Microcar Minicar Extravaganza!

We weren't planning on attending until Matilda got personally invited to the event by its organizer. With over 80 microcars, a ferry ride to Vashon Island and coverage by the BBC and Hemmings, this is going to be amazing!

Come see us at the Great Pacific Northwest Microcar Minicar Extravaganza on Sunday, July 13th from 9am to 2:30pm  at LeMay ACM Show Field located at 2702 East D. Street in Tacoma, Washington. Here is the link to the car show website for more information:
http://www.gpnwmme.com/#

Hope to see you there! 


Saturday, May 31, 2014

Function 4 Junction


Matilda made an appearance at the Function 4 Junction car show in Junction City today. We had a great time sharing her and hearing lots of n600 stories and memories from folks who stopped by to admire her.

Tuesday, October 2, 2012

Let Me Hear Your Body Talk!

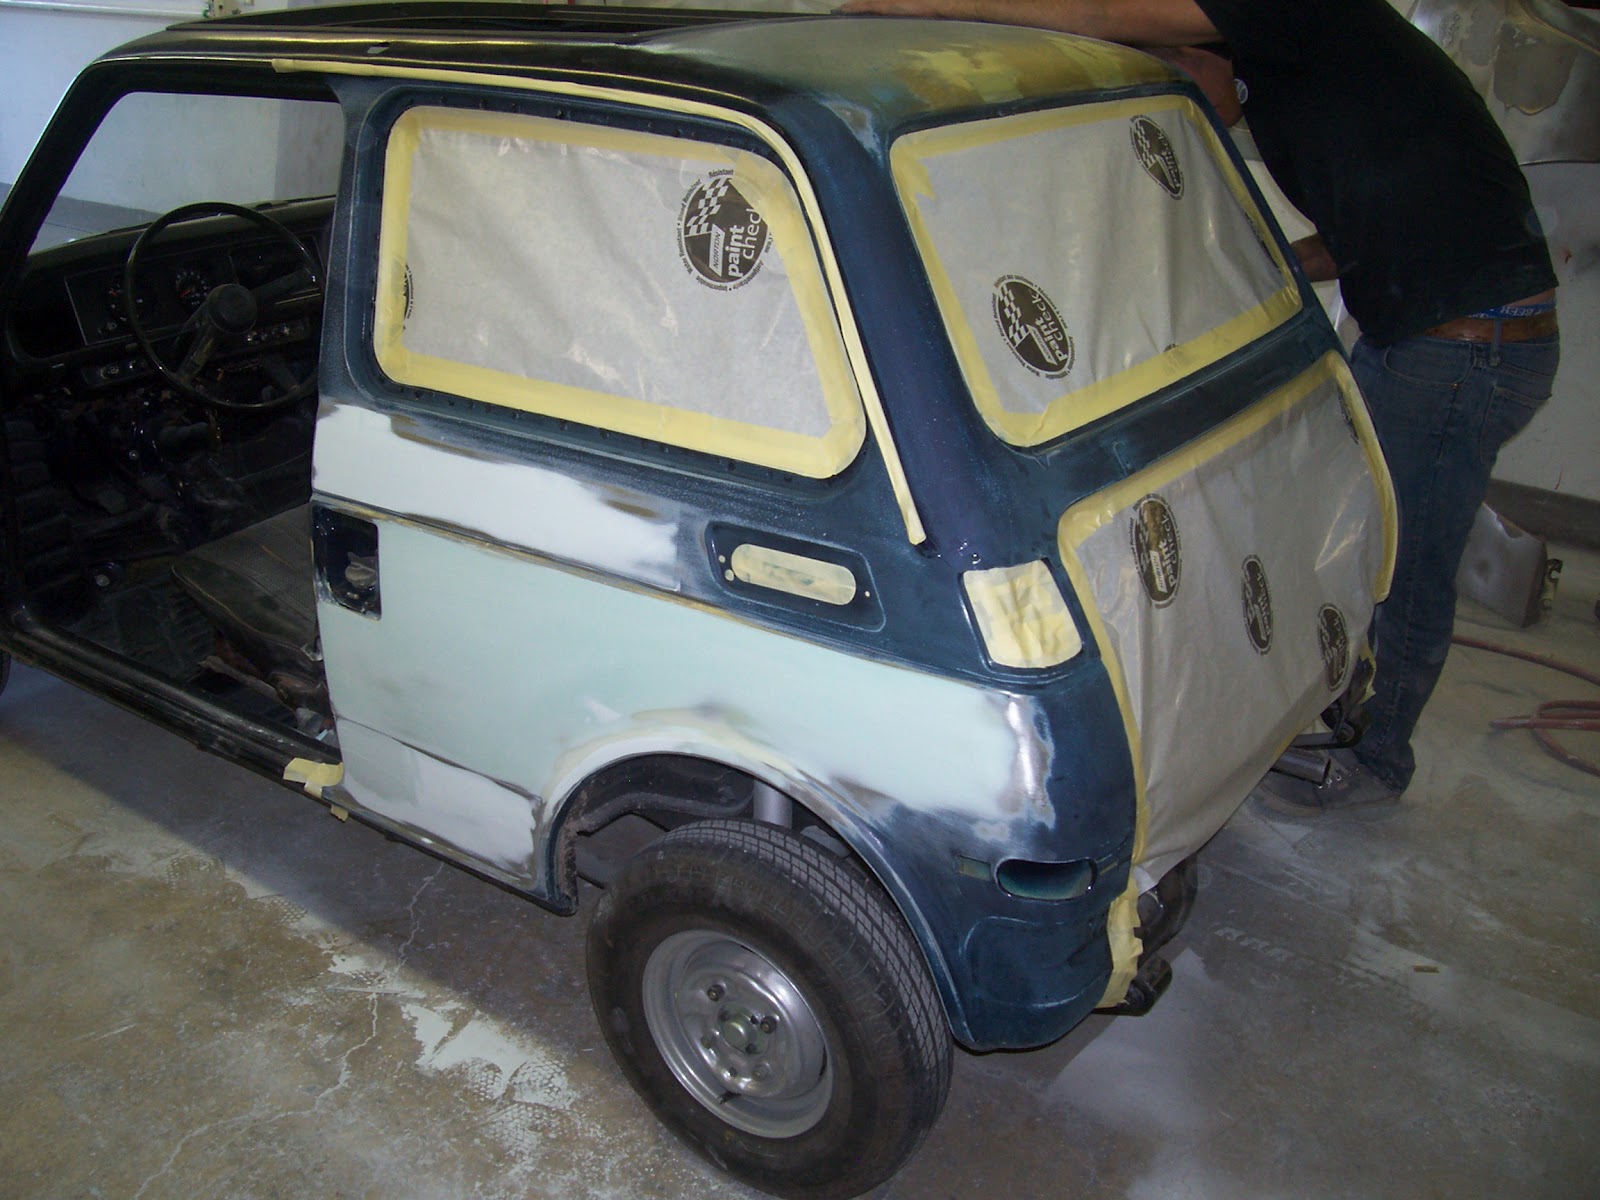
We are very excited to have finally reached the time when somebody else does some work on Matilda!  Although, I spent nearly a year sanding and prepping cars at a body shop when I was twenty, I've come to realize I am not nearly qualified to perform a quality paint job on this, or any other car.  Thankfully, the fine craftsmen at McClinton Auto Collision of Albany, OR were willing to take on the challenge.  I decided to wait until the end of summer weather to take it in.  This would give me more driving time, and allow me to save the considerable pile of cash needed to complete the job.  Well, the money part worked out fine, so I decided to trade a few sunny weekends for a chance to get her done a little early.  I drove her over to Albany last Monday, September 24th, and got the first progress pictures today.  Honestly, I figured they hadn't touched her yet, but was very pleasantly surprised to see they have the rear quarter panels in primer already!  That leaves the top, doors, fenders and hood to straighten and shoot.  Then will come color sanding, and clear coat.  I expect them to have her for roughly a couple of months, but may see her sooner, if this pace holds!

Sunday, July 1, 2012

Getting Hosed

There will always be certain items in a restoration that you just can't get.  In those cases, you try to find something that will perform a function, it not fitting the car exactly.  This is how I handled replacing the hoses that join the master cylinder to the brake fluid reservoir.  As it turns out, brake fluid does not like rubber, or many other hose mediums.  After doing some research, and visiting a few parts houses, I ended up at Willamette Hose in Tangent, OR.  They had a chemical spray hose that had the 3/8" inside diameter I needed, and it had a plastic chemical resistant lining.  They said they wouldn't sell it to me, but I could have it, if I took all they had.  Not much of a seller, apparently.  I took it, and soaked it in brake fluid for several weeks, to make sure it wouldn't degrade over time.  Since the lining seemed to hold up fine, I installed it, and went on my merry way.  The thing about the plastic lining, is that it doesn't make the best seal under a hose clamp.  I was getting a very slight leak at each of the clamps, and it never really looked right.  Fast-forward to my discovery of Honda600carparts.com.  While perusing the brake portion of the sight, I noticed they are carrying the very hose I couldn't find earlier.  The hose is an ether-based polyurethane with open-mesh polyester braiding incorporated within its wall.  I can't believe they didn't have it on the shelf at NAPA.  I put it on today, and am quite pleased with the result!

Sunday, November 27, 2011

We're Jambin'

This turned out to be a busy holiday weekend. Big surprise. Between holiday travel, an impromptu work day and a practically impromptu dinner party, I was starting to think this would have to wait. Luckily, I got into the garage this morning and finished media blasting the few remaining parts that would be needing body color. I cleaned and hung everything I could from the lift. I suited up, and shot everything with an etching primer to prep the bare metal for priming. I then gunned the catalyzed primer and single stage body color on the back sides of the fenders, under side of the hood, and insides of the doors. The Hood and door hinges, the fuel door and rear bumper panel needed to be painted prior to reassembly also, so they got the same treatment. I was conflicted about how to ventilate the garage while spraying, as I had been running two heaters all day to get up to the recommended 70 degrees. I was a little alarmed to come inside and remove my respirator and smell automotive paint. I set up the spray booth fan set up I used earlier in the project, and opened several windows in the house to clear the air. It smells fine now, but I think I will run the fans overnight to aid in drying.

Sunday, November 13, 2011

Back to The Grind(er)


Life has finally slowed down enough to allow me to get back into the garage, and back onto Matilda! It has taken me a bit to get my head back into the project, but I think I have a plan of attack. I've spent the last few weekends sand blasting small parts, and this weekend, I broke out the wire wheel. So now I have the Hood, fenders, one door, various hinges and the rear bumper panel ready for jamb-painting. I had been planning to do the final paint, as well as all of the ensuing body work, myself. Fortunately, I came to the realization a few weeks ago that that would only serve to frustrate me, and drag this project out even longer. So I have decided to find a good body and paint man to do the finish work. I fully plan to have this baby on the road next summer, so that should help. As near as I can figure, I have the passenger door to strip, and I should be ready to start the painting process all over again. It's so nice to be making real progress again!

Mergers and Acquisitions

I call it that since I am technically merging three cars into one, but this post is more about acquisitions. Our summer was insanely busy, as usual, and so progress on Matilda took a back seat (also as usual). We were both in a play, got a new puppy, worked on remodeling the kitchen, and well, it was summer. I decided that since I wasn't going have much time to spend on the car, it might be a good use of time to pick up some of the items I would eventually be needing. I'm not sure why it took me over four years to realize that the more time I waste, the less available many of these parts may become. I sometimes wonder how my brain works. So, with this revelation came action. I started contacting N-600 guys, and keeping an eye on eBay listings. Now that I have the windshield installed, I would be needing the gasket for the back window. And as long as we're talking windows, I'm gonna need weatherstripping for the pop-out side windows and the doors. Bill Colford, a great resource for parts and knowledge, had part numbers for the weatherstripping, and has a guy that manufactures the windshield gaskets. As luck would have it, Bill also has an upholsterer who makes beautiful reproduction seat vinyl. And since we're getting new seats, a new carpet kit is a must. The carpet is offered by Mike O'Connor, who built our engine. Last week I sent the door handles and trunk lock to Miles Chappell, another great resource, to have them re-keyed and polished. As always, eBay has also been a good source of various items. I got a pretty nice set of front turn signal lenses with housings from someone in California, and rear bumper brackets from Ray Cave in Missouri. I did get into an exciting bidding war over a very nice pair of tail light lenses. These are extremely rare since they were never really great quality to begin with, and after 40 years of weather exposure most of them are shot. It got up around $350 at the end of the auction, when some guy swung in in the last few seconds, and stole them. Fortunately, another guy got them from him a second later. Bloodsuckers. That prompted me to search for a way to make molds that would allow me to make new lenses on my own. I found a kit that might just work, but it will be so long until I'm ready to reinstall the tail lights, that I may come across another set somewhere.


I was pleasantly surprised by a gift from a fellow restorer, when my buddy John gave me an original N-600 brochure! It is in pristine condition and will have a prominent place in my garage when I have time to have it framed. His gift made me realize this would be a good time to pick up an original owner's manual. Both were located in Great Britain for some reason. It's always in the last place you look.

Sunday, May 8, 2011

Matilda's Big Outing!

I dunno...

It's been a while since I've been able to make any progress, as I've had a few road blocks in the way lately. I mentioned the need to follow the proper sequence of events in the last post. Well, I've been wanting to get the windshield and exhaust system installed for months now, but I needed the brakes to operate safely so that I could pull it into the glass shop, and onto the lift at the muffler shop. As luck would have it, I was directed to a place that rebuilds brake boosters in vintage cars. Not only that, but they average one N600 booster a month, so they know what they are doing. The trouble was that it is in Upland California, which required shipping out the booster and waiting a few weeks to get it back. Then I had to find time to reinstall, bleed and test it. I was very excited to test drive Matilda and have the brakes work perfectly. That meant I could take a day off, rent a dolly and pull her down town. There were several headaches involved with procuring the dolly, including having to modify the tie down system to accommodate such a narrow car, but eventually it all worked out. I was pleasantly surprised when, after examining both of my windshields, Dave the glazier noticed that one of them was in nearly perfect shape. I had to wonder when he proclaimed that the other had probably been owned by a woman. When I asked what made him think that, he pointed out the two deep scratches on the inside of the windshield. He told me that they were probably caused by someone wiping off condensation while wearing a diamond ring. Just like CSI. From there we went straight to Jerry's Precision Muffler. Jerry hadn't seen one of these cars in three or four decades, and wasn't sure what to do for a muffler. After some test fitting, and a couple of cigarettes, he decided to weld together two 18" glass-pack mufflers in the "transmission hump" and add another 12" unit out back for good measure. That would mean that we would have four feet of muffler in a ten foot long car. We wanted quiet, so I thought it sounded fine. It actually works great. I had no idea how loud the engine was since we couldn't hear it over the exhaust noise. Now, with a practically silent exhaust system, you can really hear those 36 ponies up front. We did have what looked like a very serious problem when it came time to drive off the lift. I depressed the clutch pedal to start the engine, and heard a "pop". I then noticed that the clutch pedal was hovering suspiciously close to the floor. There was no getting the car into gear. The clutch had gone out. We pushed Matilda out of the muffler shop, and onto the tow dolly for the ride home. I had just about accepted the fact that I would now have to pull the engine, and open up the clutch to see what sort of catastrophe had befallen our little car. I made a few phone calls, and sent a few emails to gather information on just how screwed I was. One suggestion I got via email was to check the clutch adjustment bolt. On a whim, I decided to tighten it a bit and see what happened. The pedal seemed a little higher. A few more turns, and it would go into gear. A few more, and I was ready to chance a test drive. Amazingly, it worked. The only thing I can figure, is that something must have been binding in the clutch housing since we got the engine, and the pop I heard was that thing falling into place. Once in place, it simply needed the adjustment bolt a little closer to do its job. What a relief! It was so much fun to drive around the block, this time while looking through safety glass, and enjoying a relatively quiet ride. I've started prepping the fenders and hood for jamb-painting and hope to have them on soon. The dream is to have her road-worthy (if not totally presentable) sometime this summer. Keep your fingers crossed!

Sunday, March 20, 2011

Details, Details...

Among the many things this project has taught me, is the importance of observing the sequence of events. At some point in the car's life, someone decided to relocate the radio antenna from its original location above the driver's side "B" pillar to above the passenger side "A" pillar. It looked like they had done this with the assistance of a can opener. One of the first body repairs I did a few years ago was to patch that gaping wound. I had not done the kind of job that would be unnoticeable under the final paint job, so I knew at some point I would have to revisit it. I've been trying to get the car ready for the windshield and exhaust system installations, and it occurred to me that I'd better get that old patch cleared up before a portion of it was covered by the windshield gasket. I've also been on the fence about the quality of the interior paint job, so I decided to sand, mask and repaint the visible surfaces while re-shooting the windshield bed. It was a lot of work for such a minor result, but I knew it would bug me later to see essentially textured paint while sitting in the car, which I hope we do a lot.


Here's a little video of my folks taking Matilda around the block. I love the perspective as they drive past full size vehicles.

Tuesday, March 15, 2011

Matilda's Maiden Voyage!

It only took four years, but Saturday the dream came true, and we drove Matilda!


The weekend began with my dad and nephew coming to help get this show on the road. I was pretty sure all that needed to be done before we could get rolling, was to bleed the brakes and adjust the clutch. I was a little nervous about the brake bleed. I had gone through the whole system and replaced or refurbished every component I could. I bent new brake lines, rebuilt the calipers, replaced all the hoses with brand new stock and replaced the master cylinder with a rebuild. I knew that I would have a potential leak at every one of the several double-flared fittings, as they are notoriously difficult to get right. As a matter of fact, I did have a few leaks, but they sealed up with a few additional wrench turns. Actually, it's been sort of magical how everything that looks like a problem seems to work itself out. Besides the brake leaks, the charging system didn't charge, the transmission wouldn't go into reverse and a needle valve in the carb stuck closed. All of these issues were fixed so easily, that it was almost worth having the problem in the first place, if only for the satisfaction. The one thing that was an issue, and still is, is the brake vacuum booster. It's amazing that a car this size has power-assist brakes at all, but when the booster doesn't work, you sure miss it. I've got emails out to the N600 gurus looking for suggestions. I could probably bypass it, but as just about every other little detail on this car is working, I'd like this to operate too. I learned an exciting statistic while doing a little online reading. It turns out that of the 40,000 plus N600s sold in the US, roughly 1,000 remain. Of those thousand, about half are restorable, and of those only about 300 are drivable. I had no idea this would be such a rare and special car when we got started, but I'm looking very forward to spreading the joy when it hits the road for real.

Sunday, March 6, 2011

Let The Body Work Begin!

I've been looking at two dents in the roof for about four years now, and I decided that today was the day to do something about them. Their size and spacing suggest that someone made an ill-fated attempt to put a roof rack on this car. Clearly, if you have furniture to buy, you should take something else to Ikea. When we first acquired this body, I attempted to get a few different body tools into the tight space beneath these dents to no avail. This only left me with one option: I needed a stud pin welder! This is one of the better inventions to happen to the auto body industry in the last generation. You simply load a small copper-coated steel pin into the gun, press the tip into the lowest point of a dent and pull the trigger. In less than one second, you have something to attach a slide hammer to, and voila! It actually takes several of these pins to work the dent out, but it is very effective, and a lot of fun. Fortunately, I'll have plenty of chances to use it, as the body has a few wrinkles. Once the dent is within 1/16" of flush, the Bondo may be applied. I worked for most of a year in a body shop in my early twenties. I learned a few basics (mostly enough to get into trouble) but never had enough practice to get really good at body and paint work. As for the body and paint on Matilda, I've decided to give it a shot, but it is notoriously difficult to make dark colors look good. I figure if I'm patient and don't mind redoing, and possibly re-redoing some things, I may have a chance at getting it right. If that doesn't work out, I may have to leave it to the pros.

Tuesday, February 1, 2011

From This...To This!


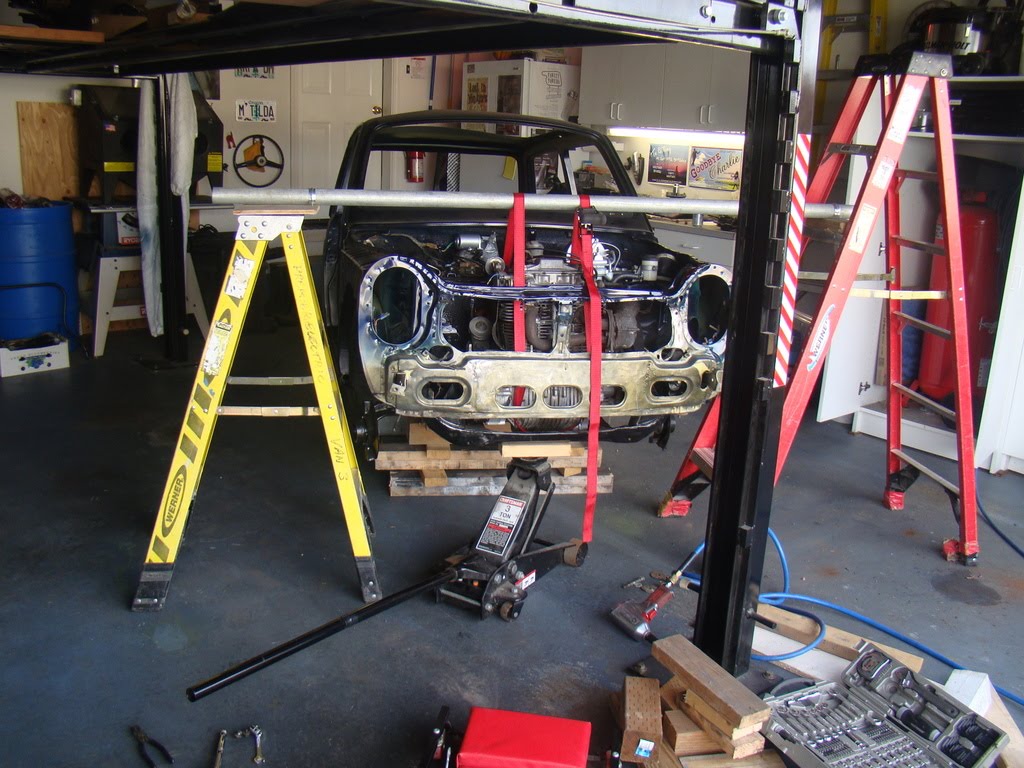
Was it dangerous? A little. Was it Hillbilly? Definitely. I had been thinking for some time how I was going to swap out the sub-frame without having to remove the engine it was holding up. I considered cutting a couple of holes in the ceiling on either side of a roof joist, and securing to that. I tried to calculate the body damage from bracing across the top of the fender pinch weld. In the end, strapping to a rigid conduit supported by two ladders seemed to be the best option. I was pleasantly surprised when it worked, and damaged neither myself nor the car. In fact, it worked so well, and so quickly, that I had time to get the front end reinstalled. While changing the sub-frame, I also installed the new rear engine mount, corrected the position of the front engine mounts and re-furbished and reinstalled the sub-frame mounts. With all that done, I was very anxious to see if the drive axles finally cleared. It turned out that they do, if only barely. While all of those corrections certainly helped, what made the difference was having them re-booted to a smaller size. It's great to have the car sitting on all four tires. Without being on a large rotisserie, or sitting on a wooden crib, it finally feels as small as it is. We're just about ready to take this baby down the road (around the block). I still need to fill and bleed the brake system, adjust the clutch and buy a new battery. And, for some reason, the pin that connects the shifter to the shift rod has vanished. It will either turn up, or it will get a bolt and nut. I've already made arrangements for towing her to the glass shop for the windshield installation (the gasket arrived yesterday), and then on to the muffler shop. This is getting good.

Sunday, January 23, 2011

A Shiny New (ish) Sub-Frame


The new sub-frame arrived about ten days ago, and though I had my fingers crossed for the new old stock part Tim had mentioned, it was actually used. This turned out to be fine, since after a trip to Willamette Powder Fab, it looks brand new. I figured that after 40 years, the original finish of an NOS part would need a little freshening up anyway, and I got the same result at a lower cost. I also used a product from the Eastwood Company to coat the interior of the sub-frame with a rust converter/inhibitor. I used the remainder of the can in the unibody channels that may have some rust hiding out. Who knows if it actually does anything, but it definitely has psychological benefits. I considered attempting to swap sub-frames today, but ran short of time for what I have in mind. The idea is to not remove the engine, even though this part holds it in. Stay tuned.


A little powder coating makes a big difference.

Wednesday, January 5, 2011

Plotting and Planning

Things have gotten a bit slow lately, but the stars are about to come into alignment. After a patient, vigilant search, I located a replacement sub-frame. I spent several weeks checking ebay listings, until one morning while on a weekend getaway, I saw what I'd been waiting for. As we were away from a computer, I immediately bought the part from my phone. The thing about those small screens, is that it's easy to miss small details. It wasn't until I got notification that the part had shipped, that I noticed the sub-frame was for a coupe. A Z600 coupe. This little two door wonder is a sedan. So I now have a 65 lb anchor in my garage. No matter. I called Tim Mings to see if he could help my predicament. He told me that, not only did he have a NOS sub-frame, but if I happened to live in the area, I could come by and pick it up gratis! Since Corvallis is no where near San Diego, he agreed to ship it to me. Tim's had a few things going on, so after nearly a month, he got it on a UPS truck today! I hope to see it early next week.
I also got Bill Colford to order me a new front windshield gasket. His parts can take up to several months, as they usually have to be manufactured, but they are considered top quality. Once we have that, I will trailer the car to the glass shop to have the windshield installed. I will then pull it directly to the muffler shop to complete the exhaust system. This will of course take place after the new sub-frame, lower control arms with their new ball joints and freshly re-booted CV shafts are all reinstalled. At this point, I fully expect the car to be able to go down the road under its own locomotion. Of course, it won't be street legal...but that is merely semantics.

Sunday, November 21, 2010

Dashing Along!

I spent the weekend getting the steering column and the shifter back together and reinstalled. I got a little nervous when the key wouldn't turn in the lock cylinder when I got everything back together. I disassembled the other car's steering column to look for clues. It turns out there's a pindle that protrudes from the lock cylinder into the steering shaft to act as the locking column. I must've gotten some grit in this mechanism during media blasting (even though I had taped it off to prevent just this sort of thing). This pindle needs to move freely to allow the lock cylinder to turn. Once I pressed it into the lock housing, the cylinder turned freely. Of course, I won't have a locking column unless it eventually pops back out. Oh well, the locking column never was much of a theft-deterrent. I heaved a sigh of relief when I was able to get the two 39 year old natural rubber boots to stretch back over the shifter linkage without tearing. I also got to try my hand at wrinkle paint on the shifter bracket. I was skeptical at first, since it goes on heavy and very glossy. But, to my pleasant surprise, when I checked it this morning, it was exactly the finish I'd hoped for. I did learn that wrinkle paint takes at least 24 hours to harden, as some spots got damaged on reassembly. So now the dash is looking even better with the steering column and wheel, the gear-shift and the pedals all in place. Sadly, they are all only temporarily installed. The dash is resting right against the body at the windshield bed. We are most likely going to have to install the windshield, and its corresponding rubber gasket, before the dash, steering column and shifter can be tightened into permanent position.

Rare Parts

Since this is the first car I have ever restored, naturally a few things have come as a surprise. I knew going into this that finding parts would be a challenge. What surprised me was how easy and readily available parts are...if you are restoring a domestic car. My uncle sent me a copy of Hemmings Motor News' Collector Car Restoration Guide. The magazine is literally riddled with ads for parts and services for the (domestic) car restoration enthusiast. Turns out, if you wanted to build a '58 Chevy pickup from reproduction parts all you need is a credit card and a place to do it. I was lucky enough to procure what may be the last two new old stock (n.o.s.) lower ball joints known to man. Mike O'Connor put me onto the CMS (Consolidated Motor Sports) website. This is essentially a clearing house for unsold motorcycle parts in The Netherlands. Is sounds like they've had these ball joints sitting on their shelf since around the time I was born. It only took five days, well five days and $300, and they arrived at my doorstep. As you can see, the original joints are in pretty sad shape. I also scored a pretty good deal on a reproduction exhaust pipe that a guy in Missouri sold me on eBay. He's been parting out a few N600s, and while most if his stuff is used, this piece was made from new material to match an original. I got notification Saturday that the bushings for the sway bar have shipped, so the front end can go together when I get the CV axles come back from the shop. This is all contingent on what happens with the sub-frame. The rust issue is forcing me to replace it, or cut out the bad spot and weld in a patch. I think it's a lost cause since it's rusting from the inside out, as a result of having spent time in the Florida Keys. Hopefully, I won't have to go to The Netherlands to find another one.

Wednesday, November 10, 2010

Minor Setback


So, in the last post I had mentioned a potentially serious problem. Well, it was only serious if a solution didn't present itself, which fortunately, it has. As I was pondering what to do about our axle rubbing problem, it occurred to me: if you have a serious N-600 problem, who do you call? Why, the N-600 God, of course! Well my good buddy, Chad, is an avid follower of the Jalopnik website. A few years ago, they did an article on a fellow named Tim Mings, who is apparently the guru of all things N-600. So I gave him a call on Monday to see if he had ever heard of axles rubbing on sub-frames while up on blocks. Turns out he hadn't. He did want to see some photos, though, and had a few suggestions from there. So the engine cradle (a.k.a. subframe) mounts actually have a front and rear, and it matters how they are installed. Apparently, I have them all sorts of upside-down and front-to-back. Also, I need a new rear engine mount. I knew this already, but was willing to try to use the one I have for now. Tim has this particular mount in stock as a NOS part. Since I try to learn something new everyday (or have it thrust upon me), I discovered that NOS means, "New Old Stock". This is the greatest thing possible, because that means that this part is original Honda stock that never sold back in the day. Also, it looks like the boots on my newly rebuilt CV shafts are a little over-sized, which is contributing to them rubbing on the sub-frame. After a quick call to Oregon Axle, they agreed to re-boot them to a smaller size that will hopefully clear. So, long story short, after a new rear motor mount, a CV re-booting and the installation of the sway-bar, we should probably be clear for take-off. There is a minor rust issue on the engine cradle, but that's another story for another day...

Sunday, November 7, 2010

It..Is...ALIVE!


Completely defying my expectations for this weekend, we actually started the engine. This had been my hope for the past few weeks, but as time ran short, I had accepted the reality that turning this thing over was probably not going to happen. Well, I had my dad work on rebuilding the carb while I started getting the front end put together. Luckily, the old man was "The Carb Guy" at his auto shop before he retired, and he made short order of the little beast. We did run into what has the potential to be a major problem. For some reason, the drive axles are hitting the sub-frame. Normally this wouldn't be too big an issue, since they should straighten out once the car is sitting on its tires. The problem is, when we used a floor jack to compress the struts, the CV boot was still in such solid contact with the frame, that it would have destroyed itself had it turned under power. So far I've checked with a couple of N600 savants, and a few of the more mechanically inclined fellows I know, and we're baffled. Clearly, the car will never move unless we correct this issue, so I have to figure this one out. On the bright side, We got the dash and wiring harness installed, oh, and we STARTED THE ENGINE!

Thursday, October 28, 2010

New Finishes.

I've been spending a bit of quality time with the blast cabinet and the spray can. Just about every surface on, in and under this car needs refurbishment. I recently re-did the front suspension, brake calipers and dash. As it turns out, the guys at Oregon Axle had just enough parts to do our CV shafts. Three of the four joints were pretty much destroyed, so they completely replaced those, and cleaned, lubed and re-booted the fourth. I've also been pretty concerned about what to do for struts. As luck would have it, once disassembled and blasted, I discovered I had a pair of Tokico struts that are actually in pretty good shape. Now freshly painted and reassembled, they look brand new! I've turned my attention to the dash, which will need to go in before I can even think about the day we fire this baby up. I've had a pretty good time bringing the dash back to life. Naturally, after a lifetime of exposure to the sun's life-giving radiation, the dash pad was cracked and discolored. Vic at Chuck's Upholstery, here in Corvallis, recovered the pad with a thin, pliable vinyl used for ATV seats. Between our impending need for a headliner, door panels and original looking vinyl seats, I see a lot of work in Vic's future. After I had cleaned the rest of the dash, repainted the forward trim piece and re-affixed the VIN plate, I reinstalled the pad. I also hand-painted the raised lettering and border with the touch-up paint from Carley's '04 Accord. While taking the paint off of a dash piece, I discovered that if one intends to commit suicide, I do NOT recommend using an angle grinder to slash one's wrists. I got the shifter disassembled and painted, which was a challenge as it was not made to be taken apart. Now I need to concentrate on pedals, wiring and cables for clutch, choke and whatever else presents itself. My dad will be back next weekend to lend a hand. I need to try to get as much of this accomplished as I can so I can make good use of his talents. I got a carb kit for a '75 Honda Goldwing, which apparently has a number of usable parts. No one actually makes a kit for this car, so this is what people use to rebuild the carbs. Mike O'Connor (the guy who built our engine) let me know these have a tendency to have trouble with accelerator pump diaphragms drying out and going bad. Of course this part is also unavailable, but he happens to have a guy who makes them for him, so he sent me one. Heck of a guy.