
Showing posts with label restoration. Show all posts
Showing posts with label restoration. Show all posts
Monday, January 6, 2014
Tuesday, October 2, 2012
Let Me Hear Your Body Talk!

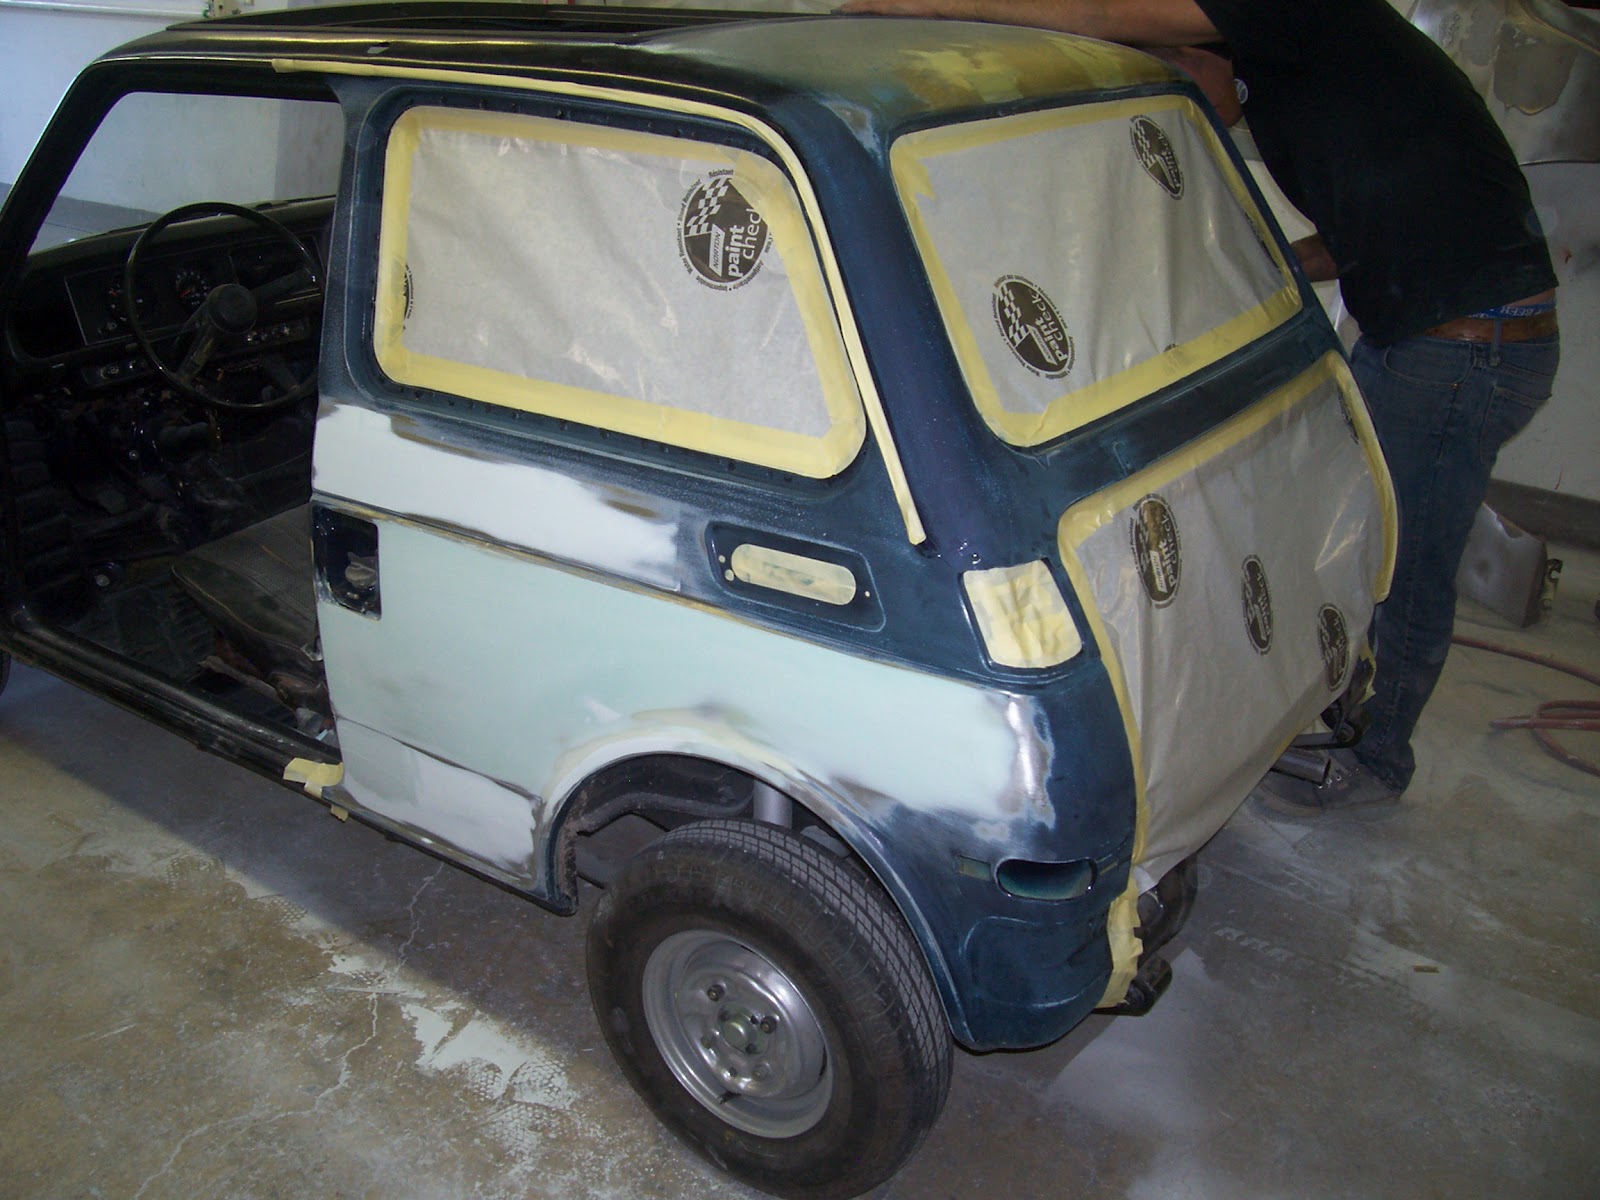 We are very excited to have finally reached the time when somebody else does some work on Matilda! Although, I spent nearly a year sanding and prepping cars at a body shop when I was twenty, I've come to realize I am not nearly qualified to perform a quality paint job on this, or any other car. Thankfully, the fine craftsmen at McClinton Auto Collision of Albany, OR were willing to take on the challenge. I decided to wait until the end of summer weather to take it in. This would give me more driving time, and allow me to save the considerable pile of cash needed to complete the job. Well, the money part worked out fine, so I decided to trade a few sunny weekends for a chance to get her done a little early. I drove her over to Albany last Monday, September 24th, and got the first progress pictures today. Honestly, I figured they hadn't touched her yet, but was very pleasantly surprised to see they have the rear quarter panels in primer already! That leaves the top, doors, fenders and hood to straighten and shoot. Then will come color sanding, and clear coat. I expect them to have her for roughly a couple of months, but may see her sooner, if this pace holds!
Monday, January 2, 2012
Let's Get Street Legal!

I've been collecting informal estimates to get the final body and paint work done, and keep getting asked to, "Bring it in, so can see what we're working with." So it occurred to me I could put the doors and fenders on, get the lights working, install some seat belts and drive it in to the shops. I realize that almost everything I put on, will have to come back off for the paint job, so I have to keep my improvements to a minimum. So far, I've been getting figures between three and five thousand dollars to make this little ride smooth and shiny. Considering I have less than that saved, and I refuse to go into debt for something like this, it made more sense to wait until next winter to make her pretty, and just drive it as is. That way, with a bit of a cash buffer, I can get this job done right, and in the mean time, we get to actually drive the car! So today, we took a short, and slightly illegal (as we have yet to procure insurance), trip to the gas station for Matilda's first fill-up. We'd been running on the first gallon of gas we put in when we did the first test fire those many months ago, and ran out of gas on the way. Fortunately, Matilda weighs little enough, that it was a pretty comfortable push home. Naturally, a city bus just had to come around the corner as we were trying to stay in the bike lane, but it all worked out. We got gas, I did the first oil change, and re-tightened the CV shaft bolts and bent the holding tabs. Our seat belts will be here Wednesday. That just leaves insurance. I tried talking to our usual insurance company, but they were sky-high. I've since talked to two collectors' car insurance companies, and should hopefully be covered by the end of the week. With any luck, we should be able to take a substantial drive next weekend. I really want to get a couple of hundred miles on this engine to make sure it will make it.
Sunday, November 13, 2011
Back to The Grind(er)

Life has finally slowed down enough to allow me to get back into the garage, and back onto Matilda! It has taken me a bit to get my head back into the project, but I think I have a plan of attack. I've spent the last few weekends sand blasting small parts, and this weekend, I broke out the wire wheel. So now I have the Hood, fenders, one door, various hinges and the rear bumper panel ready for jamb-painting. I had been planning to do the final paint, as well as all of the ensuing body work, myself. Fortunately, I came to the realization a few weeks ago that that would only serve to frustrate me, and drag this project out even longer. So I have decided to find a good body and paint man to do the finish work. I fully plan to have this baby on the road next summer, so that should help. As near as I can figure, I have the passenger door to strip, and I should be ready to start the painting process all over again. It's so nice to be making real progress again!
Mergers and Acquisitions
I call it that since I am technically merging three cars into one, but this post is more about acquisitions. Our summer was insanely busy, as usual, and so progress on Matilda took a back seat (also as usual). We were both in a play, got a new puppy, worked on remodeling the kitchen, and well, it was summer. I decided that since I wasn't going have much time to spend on the car, it might be a good use of time to pick up some of the items I would eventually be needing. I'm not sure why it took me over four years to realize that the more time I waste, the less available many of these parts may become. I sometimes wonder how my brain works. So, with this revelation came action. I started contacting N-600 guys, and keeping an eye on eBay listings. Now that I have the windshield installed, I would be needing the gasket for the back window. And as long as we're talking windows, I'm gonna need weatherstripping for the pop-out side windows and the doors. Bill Colford, a great resource for parts and knowledge, had part numbers for the weatherstripping, and has a guy that manufactures the windshield gaskets. As luck would have it, Bill also has an upholsterer who makes beautiful reproduction seat vinyl. And since we're getting new seats, a new carpet kit is a must. The carpet is offered by Mike O'Connor, who built our engine. Last week I sent the door handles and trunk lock to Miles Chappell, another great resource, to have them re-keyed and polished. As always, eBay has also been a good source of various items. I got a pretty nice set of front turn signal lenses with housings from someone in California, and rear bumper brackets from Ray Cave in Missouri. I did get into an exciting bidding war over a very nice pair of tail light lenses. These are extremely rare since they were never really great quality to begin with, and after 40 years of weather exposure most of them are shot. It got up around $350 at the end of the auction, when some guy swung in in the last few seconds, and stole them. Fortunately, another guy got them from him a second later. Bloodsuckers. That prompted me to search for a way to make molds that would allow me to make new lenses on my own. I found a kit that might just work, but it will be so long until I'm ready to reinstall the tail lights, that I may come across another set somewhere.

I was pleasantly surprised by a gift from a fellow restorer, when my buddy John gave me an original N-600 brochure! It is in pristine condition and will have a prominent place in my garage when I have time to have it framed. His gift made me realize this would be a good time to pick up an original owner's manual. Both were located in Great Britain for some reason. It's always in the last place you look.
 extremely rare since they were never really great quality to begin with, and after 40 years of weather exposure most of them are shot. It got up around $350 at the end of the auction, when some guy swung in in the last few seconds, and stole them. Fortunately, another guy got them from him a second later. Bloodsuckers. That prompted me to search for a way to make molds that would allow me to make new lenses on my own. I found a kit that might just work, but it will be so long until I'm ready to reinstall the tail lights, that I may come across another set somewhere.

I was pleasantly surprised by a gift from a fellow restorer, when my buddy John gave me an original N-600 brochure! It is in pristine condition and will have a prominent place in my garage when I have time to have it framed. His gift made me realize this would be a good time to pick up an original owner's manual. Both were located in Great Britain for some reason. It's always in the last place you look.
Sunday, May 8, 2011
Matilda's Big Outing!
 I dunno...
It's been a while since I've been able to make any progress, as I've had a few road blocks in the way lately. I mentioned the need to follow the proper sequence of events in the last post. Well, I've been wanting to get the windshield and exhaust system installed for months now, but I needed the brakes to operate safely so that I could pull it into the glass shop, and onto the lift at the muffler shop. As luck would have it, I was directed to a place that rebuilds brake boosters in vintage cars. Not only that, but they average one N600 booster a month, so they know what they are doing. The trouble was that it is in Upland California, which required shipping out the booster and waiting a few weeks to get it back. Then I had to find time to reinstall, bleed and test it. I was very excited to test drive Matilda and have the brakes work perfectly. That meant I could take a day off, rent a dolly and pull her down town. There were several headaches involved with procuring the dolly, including having to modify the tie down system to accommodate such a narrow car, but eventually it all worked out. I was pleasantly surprised when, after examining both of my windshields, Dave the glazier noticed that one of them was in nearly perfect shape. I had to wonder when he proclaimed that the other had probably been owned by a woman. When I asked what made him think that, he pointed out the two deep scratches on the inside of the windshield. He told me that they were probably caused by someone wiping off condensation while wearing a diamond ring. Just like CSI. From there we went straight to Jerry's Precision Muffler. Jerry hadn't seen one of these cars in three or four decades, and wasn't sure what to do for a muffler. After some test fitting, and a couple of cigarettes, he decided to weld together two 18" glass-pack mufflers
 in the "transmission hump" and add another 12" unit out back for good measure. That would mean that we would have four feet of muffler in a ten foot long car. We wanted quiet, so I tho
 ught it sounded fine. It actually works great. I had no idea how loud the engine was since we couldn't hear it over the exhaust noise. Now, with a practically silent exhaust system, you can really hear those 36 ponies up front. We did have what looked like a very serious problem when it came time to drive off the lift. I depressed the clutch pedal to start the engine, and heard a "pop". I then noticed that the clutch pedal was hovering suspiciously close to the floor. There was no getting the car into gear. The clutch had gone out. We pushed Matilda out of the muffler shop, and onto the tow dolly for the ride home. I had just about accepted the fact that I would now have to pull the engine, and open up the clutch to see what sort of catastrophe had befallen our little car. I made a few phone calls, and sent a few emails to gather information on just how screwed I was. One suggestion I got via email was to check the clutch adjustment bolt. On a whim, I decided to tighten it a bit and see what happened. The pedal seemed a little higher. A few more turns, and it would go into gear. A few more, and I was ready to chance a test drive. Amazingly, it worked. The only thing I can figure, is that something must have been binding in the clutch housing since we got the engine, and the pop I heard was that thing falling into place. Once in place, it simply needed the adjustment bolt a little closer to do its job. What a relief! It was so much fun to drive around the block, this time while looking through safety glass, and enjoying a relatively quiet ride. I've started prepping the fenders and hood for jamb-painting and hope to have them on soon. The dream is to have her road-worthy (if not totally presentable) sometime this summer. Keep your fingers crossed!
 my windshields, Dave the glazier noticed that one of them was in nearly perfect shape. I had to wonder when he proclaimed that the other had probably been owned by a woman. When I asked what made him think that, he pointed out the two deep scratches on the inside of the windshield. He told me that they were probably caused by someone wiping off condensation while wearing a diamond ring. Just like CSI. From there we went straight to Jerry's Precision Muffler. Jerry hadn't seen one of these cars in three or four decades, and wasn't sure what to do for a muffler. After some test fitting, and a couple of cigarettes, he decided to weld together two 18" glass-pack mufflers
 in the "transmission hump" and add another 12" unit out back for good measure. That would mean that we would have four feet of muffler in a ten foot long car. We wanted quiet, so I tho
 ught it sounded fine. It actually works great. I had no idea how loud the engine was since we couldn't hear it over the exhaust noise. Now, with a practically silent exhaust system, you can really hear those 36 ponies up front. We did have what looked like a very serious problem when it came time to drive off the lift. I depressed the clutch pedal to start the engine, and heard a "pop". I then noticed that the clutch pedal was hovering suspiciously close to the floor. There was no getting the car into gear. The clutch had gone out. We pushed Matilda out of the muffler shop, and onto the tow dolly for the ride home. I had just about accepted the fact that I would now have to pull the engine, and open up the clutch to see what sort of catastrophe had befallen our little car. I made a few phone calls, and sent a few emails to gather information on just how screwed I was. One suggestion I got via email was to check the clutch adjustment bolt. On a whim, I decided to tighten it a bit and see what happened. The pedal seemed a little higher. A few more turns, and it would go into gear. A few more, and I was ready to chance a test drive. Amazingly, it worked. The only thing I can figure, is that something must have been binding in the clutch housing since we got the engine, and the pop I heard was that thing falling into place. Once in place, it simply needed the adjustment bolt a little closer to do its job. What a relief! It was so much fun to drive around the block, this time while looking through safety glass, and enjoying a relatively quiet ride. I've started prepping the fenders and hood for jamb-painting and hope to have them on soon. The dream is to have her road-worthy (if not totally presentable) sometime this summer. Keep your fingers crossed!
Tuesday, March 15, 2011
Matilda's Maiden Voyage!
It only took four years, but Saturday the dream came true, and we drove Matilda!
The weekend began with my dad and nephew coming to help get this show on the road. I was pretty sure all that needed to be done before we could get rolling, was to bleed the brakes and adjust the clutch. I was a little nervous about the brake bleed. I had gone through the whole system and replaced or refurbished every component I could. I bent new brake lines, rebuilt the calipers, replaced all the hoses with brand new stock and replaced the master cylinder with a rebuild. I knew that I would have a potential leak at every one of the several double-flared fittings, as they are notoriously difficult to get right. As a matter of fact, I did have a few leaks, but they sealed up with a few additional wrench turns. Actually, it's been sort of magical how everything that looks like a problem seems to work itself out. Besides the brake leaks, the charging system didn't charge, the transmission wouldn't go into reverse and a needle valve in the carb stuck closed. All of these issues were fixed so easily, that it was almost worth having the problem in the first place, if only for the satisfaction. The one thing that was an issue, and still is, is the brake vacuum booster. It's amazing that a car this size has power-assist brakes at all, but when the booster doesn't work, you sure miss it. I've got emails out to the N600 gurus looking for suggestions. I could probably bypass it, but as just about every other little detail on this car is working, I'd like this to operate too. I learned an exciting statistic while doing a little online reading. It turns out that of the 40,000 plus N600s sold in the US, roughly 1,000 remain. Of those thousand, about half are restorable, and of those only about 300 are drivable. I had no idea this would be such a rare and special car when we got started, but I'm looking very forward to spreading the joy when it hits the road for real.
Sunday, November 7, 2010
It..Is...ALIVE!
Completely defying my expectations for this weekend, we actually started the engine. This had been my hope for the past few weeks, but as time ran short, I had accepted the reality that turning this thing over was probably not going to happen. Well, I had my dad work on rebuilding the carb while I started getting the front end put together. Luckily, the old man was "The Carb Guy" at his auto shop before he retired, and he made short order of the little beast. We did run into what has the potential to be a major problem. For some reason, the drive axles are hitting the sub-frame. Normally this wouldn't be too big an issue, since they should straighten out once the car is sitting on its tires. The problem is, when we used a floor jack to compress the struts, the CV boot was still in such solid contact with the frame, that it would have destroyed itself had it turned under power. So far I've checked with a couple of N600 savants, and a few of the more mechanically inclined fellows I know, and we're baffled. Clearly, the car will never move unless we correct this issue, so I have to figure this one out. On the bright side, We got the dash and wiring harness installed, oh, and we STARTED THE ENGINE!
Sunday, July 11, 2010
The Ball is Rolling!

So a few areas of the project have been coming together nicely. I've been trying to get the rear-end done so that I may drop the body off the rotisserie in preparation for the engine's arrival. Prepping the rear-end involved doing the rear brakes, and re-bending related brake lines. There was also a little challenge finding a replacement brake hose to feed those lines, bearings and related oil seals for the hubs, and rebuild kit
 s for the wheel cylinders. Ah, the joys of restoring a car that is not only old, but had very little value even when it was brand new... Well it turns out that asking the guys that do only these cars has a lot of value. Bill Colford happened to have the rear brake hose on the shelf of his eBay store, and had a few words of wisdom regarding wheel cylinder kits. Turns out that they are a direct match for the '93 Geo Metro. As for the rest of it, Honda used sealed bearings on the rear hubs that fortunately were still in good shape, as were the oil seals. I had my twentieth high school reunion a few weekends ago, which afforded me the chance to mooch a favor off of my dad, who though recently retired after a thirty plus year career as a mechanic, still had access to a brake lathe. The drums turned out fine, while the rotors were about a millimeter under the nine millimeter recommended minimum. With as rusty as they were, I count myself lucky to be that close. So today, I was able to finally get the fuel tank back onto its mounts. I had to get the e-brake cable and its related guides into place as well as the gas tank vent hose attached before the tank could go in. Thank God I have a parts car to pull from and see how things go together just a few feet away!
 The refurbished fuel tank and rear end.
Sunday, April 4, 2010
A Little Brake Work, A Little Body Work
As usual, it's been quite a while since I've posted anything. I have actually made a little progress lately. I use the term, "little" in its literal sense. I recently picked up a media blasting cabinet, and a small parts tumbler. This allowed me to re-finish the power brake booster before reinstalling it. I've bent new b rake lines for most of the brake system, and with the booster in place, have started installing them as well. While I was doing that, Chad got going on straightening out the header panel. That's a tough one, since we haven't got a straight one to match it to on any one of the three bodies we're working with. Considering the damage to the thin
  metal of the header, Chad did a great job getting it where it needed to be. It should just need a skim-coat of Bondo, which is way less than it had when we started! We even got to use the stud-welder for more than just practice. A few rare parts have also presented themselves. I've had a few conversations with a fellow named
 Bill Colford, who is very well known in N600 circles, and he let me know that he is offering side-marker lens replacements. I bought back-up light lenses from him a few months ago, and was glad to hear he had a line on these units. During the process of ordering a pair of side-markers from him, I inquired about shocks and struts. Bill was very helpful with a quick recommendation for a KYB rear shock that was a direct replacement. Unfortunately, front struts are going to be a bit more of a challenge. Apparently, Bilstein made a replacement back in the day, but no longer. It sounds like they will rebuild them if you can find a pair, but they are of course rare. I'm glad to have found shocks, as it will allow the rear axle to be installed when I get to that point. There's really not a ton of work to do before the body could come off the rotisserie, so that's what I'm shooting for.
 rake lines for most of the brake system, and with the booster in place, have started installing them as well. While I was doing that, Chad got going on straightening out the header panel. That's a tough one, since we haven't got a straight one to match it to on any one of the three bodies we're working with. Considering the damage to the thin
  metal of the header, Chad did a great job getting it where it needed to be. It should just need a skim-coat of Bondo, which is way less than it had when we started! We even got to use the stud-welder for more than just practice. A few rare parts have also presented themselves. I've had a few conversations with a fellow named
 Bill Colford, who is very well known in N600 circles, and he let me know that he is offering side-marker lens replacements. I bought back-up light lenses from him a few months ago, and was glad to hear he had a line on these units. During the process of ordering a pair of side-markers from him, I inquired about shocks and struts. Bill was very helpful with a quick recommendation for a KYB rear shock that was a direct replacement. Unfortunately, front struts are going to be a bit more of a challenge. Apparently, Bilstein made a replacement back in the day, but no longer. It sounds like they will rebuild them if you can find a pair, but they are of course rare. I'm glad to have found shocks, as it will allow the rear axle to be installed when I get to that point. There's really not a ton of work to do before the body could come off the rotisserie, so that's what I'm shooting for.
Monday, July 27, 2009
Fuel System Work Begins
I was excited to get to this part of the process, not only to get rid of the vinegary rotten-gas smell in the garage, but it was a quick way to see a big difference. I also knew that there would be a bunch of varnish and rust in the fuel tank that would have to come out, or we'd never get this baby running. The Eastwood Company is an online shop for auto restoration that specializes in coatings that resemble OEM finishes. They carry a gas tank sealing kit that allows you to revitalize your old tank in twelve easy steps! It was a pretty filthy and environmentally questionable process, but it turned out pretty well in the end. The final photo shows the pristine coating in the filler neck that is supposed to be uniform throughout the gas tank's interior. Unfortunately, it was no where near that coated for most of the tank, but it should pretty much keep all the crap out of the rest of the fuel system, so I figure I got my money's worth. One major hurtle was that the 18", or so, of fuel line that act as an intake within the tank itself, was completely varnished shut. After trying to figure out how to clean a piece of tubing that has an inside diameter of less than 1/4" and also has two 90 degree bends in it, I settled on using a frayed piece of bicycle brake cable in a drill motor to ream it out. This, mixed with a little Zippo fuel as a solvent, worked remarkably well. Last thing was to spend a little quality time with my old friend the angle-grinder to clean off the outside of the tank, and shoot it with a special zinc coating for gas tanks from Eastwood's.


Wednesday, July 1, 2009
UNDERCOATING!
 Well, it finally happened. After over a year of prepping, pondering and a little painting, Matilda actually made it into Line-X for undercoating. My original plan was to load the body on the cheesy folding Harbor Freight utility trailer that I bought especially for this purpose, stuff the rotisserie into the back of my truck, and attempt to set up this contraption by myself. Thankfully Chad decided not only to help, but to rope his dad, Jim, into the adventure as well. Turns out, that three guys can just
 pick the body up, and put it wherever it needs to go. The fact that Jim also has a fourteen foot car hauler that allowed us to put the whole setup on a moving platform, didn't hurt either. I had envisioned the need for all sorts of elaborate cribbing to hold the car in place during the trip to Salem, but since we were able to simply lift it into place when attaching it to the rotisserie, we just let it ride on the trailer deck, which it did like a champ. I noticed a number of people on I-5 trying to get a closer look at the strange little car on that trailer
 .
.When we arrived at Line-X, we were greeted by the owner, Wade Starbuck and his crew. They were great to work with, as they were both professional and helpful. I was asked about use of the vehicle, placement of the material, and to what thickness I wanted it applied. Wade even went so far as to call me after the masking was complete to see if I wanted to get some pictures of the process! He explained that the material is a two part chemical blend that is kept separate as it is heated and pressurized to 2500 psi, before it is mixed by the spray gun during application. The amazing thing to me, is that after ten seconds it is set up well enough that you can walk on it! Another surprise is that Line-X is also practically non-toxic. I thought that any material that had all of these properties would definitely be adding to the hole in the ozone layer, but I guess we'll have to look to our other
 pursuits for that.
Needless to say, I couldn't be happier with the finished product. This is exactly what I've had in mind for the last year. We have a surface that is practically bullet-proof, let alone rust-proof and will cut down on road noise. The best part is, now we have a great base on which to build a beautiful little car.

Sunday, May 31, 2009
There's Color in the Air...
 Fans line the bottom of the garage door, transforming our garage into a makeshift spray booth.
I realize it's been a long six months since my last post. For the past five and a half months, a lot of the same tedious tasks were taking place, and I knew few people would want to hear about the seemingly never-ending grinding off of paint down to bare metal. So I decided to wait and spare you the boring details. There was a lot of grinding, a lot of dust, and a lot of vacuuming and cleaning in between. I finished up grinding in mid-February, about a year after I began. I was ecstatic to finally be able to cross that task off the restoration checklist.
 Down to bare metal
So, at long last, I finally got to shoot some paint on the body. This turned out to be a good way to figure out how to apply a few different types of primer and see how my garage spray-booth would perform.
 Mixing the etching primer
Since I had taken most of the body to bare metal, it was necessary to dust it with an etching primer before proceeding to a catalyzed primer, and finally a single-stage body color. I was a little unsure as to when in the process I should seal the body seams. My Uncle Joe suggested etching, then sealing. I was leaning that way since it made sense, but it also added a bit of extra work. There's a window of time that you can shoot the next type of paint without having to re-sand and re-clean, and since I took the time to caulk seams, I missed that window. This meant that not only would I have to scuff the entire body with 100-grit paper, I would also have to re-shoot the etching primer before proceeding to the other two paint types. I didn't mind too much, after I had finished sanding, since it really seemed like the way to get the best bond.


Caulking the seams/Primer coat on
All in all, I'm pretty happy with how it came out. I would be supremely disappointed if this were in any way supposed to resemble the finished product, because it does not! There are places that look like textured drywall, a few landslide runs, and I actually ran out of body color! If I'm reading the data sheets correctly, I should be able to pick up a quart of paint tomorrow, and still be within the window for re-coating, so that part should be okay. As for the blemishes, this only really needs to look decent in the engine compartment and interior. The rest of it will either fall within the tiny unnoticeable spaces around window glass and doors, or be covered completely.
 First coat of Matilda purple!
—GP
Sunday, November 30, 2008
Scalping Matilda
 It's been part of the original vision of the car to cut out most of the top and install a sliding ragtop similar to those found on original Mini Coopers. Around six weeks ago, I ordered just such a top from a company in Arizona called, Street Beat Customs. They told me it would take six to eight weeks to receive, as they would have to custom make it to the 35x37" dimension that I wanted. It actually only took about a month, and with a few weeks for me to get around to it, I finally fired up the jigsaw. The original sheet metal that makes up the roof is very thin and has almost no integrity. I'm hoping that adding the aluminum frame of the slider will add a considerable amount of rigidity, because it would be impossible to straighten anything on the top of this little car as it is.
Friday, March 14, 2008
1971: A Race Oddity
Click the play button to see Matilda's successful ride on the auto rotisserie.
Sunday we had Chad over for breakfast, and a little "car-listhenics". That's getting exercise by lifting a small car off of a motorcycle trailer. We then unloaded the rotisserie and started setting it up. I had already read the instructions, and watched a video on the proper way to rig the Whirly Gig Body Handler, but that didn't stop us from figuring it out anyway. Actually, Chad had to get to work, and even though I didn't really expect to have it up and running in one day, I had it horizontal by lunchtime! I must say the little car looks pretty cool rigged as it is, and it's going to make the undercarriage work a snap.
Sunday, March 9, 2008
Light as a feather, stiff as a board....RISE!
In preparation for loading onto the auto rotisserie, Matilda's body was lifted off the trailer and onto the floor.
Sunday, March 2, 2008
Rotisserie Retrieval
 So, this morning, we got up early (for a Sunday) and got after it. Carley had a study date with another X-ray student in Lebanon (the town, not the country), and I met Chad for a quick trip to Cottage Grove to see his parents and pick up the auto-rotisserie. It was my first trip to the folks' place, and what a place it is! Right after crossing the river that they refer to as "the creek", you're immediately greeted by a very quaint Tudor-style home nestled in the woods, and a full professional grade auto shop that would make any mechanic's mouth water. Chad's dad, Jim had the larger pieces of the rig suspended by chain from the cable crane of his heavy equipment service truck, making load-up a snap. I was treated to a tour of his shop, which included a look at a few of the cars he's restored o
 ver the years. I see where Chad gets his knowledge of, and his love for cars. After a nice visit with his mom, Nancy, we were back on the road, stopping only to save the life of a wayward salamander. We transferred everything to my truck where it was parked, and now await the opportunity to set this puppy up! —GP
Sunday, February 24, 2008
Breaking the Logjam
 Our nephew Brendan came down again to help us with a little auto-restoration fun. I'd been saving the tear-down of the passenger door for him, and since we're in sort of a holding pattern on the undercoating, we finally got back to the engine. I'd hit a road block several months ago, when I was unable to remove the clutch plate. It was supposed to just slide right off the shaft with minimal effort, but hadn't budged since bell-bottoms were in style. My buddy Noah was over to help and hang out, so between the three of us, we were eventually able to come up with a suitably dangerous solution to the problem. Turns out that all it took was grinding down two of the adapters for the slide hammer, holding a torch on the hub until it released the requisite noxious fumes, a little cursing, a lot of hammering, and we were home! After that is was practically no effort at all to open the drive chain housing, and remove the drive gears and sprocket. By this point we were all pretty pleased with the weekend's progress and didn't want to push our luck.
For a short introduction to the project, click the play button to watch our first Matilda video log:
—GP
Monday, February 11, 2008
Body Work Begins


Even though we are blessed enough to have an almost completely rust-free body, there were a few little spots that needed some attention. Fortunately, they are in places that will never be seen, but since we are doing this thing all the way, I figured it'd be a good chance to remind myself how to do this body work stuff. The worst of the two places that had actually rusted through, was under the driver-side door sill plate. I remembered taking care of some similar holes in a car when I worked for Tom Brown at Coachworks Autobody when I was nineteen. It involved tapping the rusty spot with a pointed hammer until you've broken out anything that isn't solid metal. This has the effect of bending the surrounding area down slightly which makes the body filler portion of the repair work better. Then you cut some light-gauge sheet metal into shapes that will fill the hole, while sitting into the recess created by the hammering. Next, you apply a coat of Duraglas (fiberglass body filler) to the hole, insert your metal plates, and cover the whole works with another layer of Duraglas. After sanding, and re-filling any low spots with regular Bondo, it's ready for primer. —GP
Sunday, January 27, 2008
Body Deconstruction is Complete.
 Well, I talked myself into it. I called the guy at the Line-X place in Salem where I had the bedliner for our truck done, and he guessed that it would be about the same price to undercoat this little car as it was for the bedliner. The only challenge is that he wants the car standing on end so that he can stand the requisite four to six feet from it to spray on the material. I've been brainstorming some sort of carpet-covered wooden apparatus that will work as a stand that will allow not only his application, but my removal of the old undercoating from a comfortable standing position. While thinking on this geometric feat, I got a little more work done this weekend. I've been battling a broken bolt in the rear bumper bracket that has prohibited me from sliding it from the channel in the unibody. Well, now that I had dropped the leaf springs (and fuel tank), I had an unencumbered shot at the offending bolt from underneath. It took a little maneuvering, but I was able to insert a small cutting wheel from a dremel tool into a slot in the body, and cut off the remains of the bolt, allowing the bumper to come free. This left only the front break hoses and mud flaps, and the body would be only a shell. Of course, there is a ton of prep work to do before it will be ready for undercoating, but is nice to be done with the (except for the engine) deconstruction phase. —GP
Subscribe to:
Posts (Atom)